I had an idea. What if I put a heart icon on my blog, and when people click it, an actual (heart-shaped) light in my room turns on? Just a fun little way for folks reading my blog to send some love.
So I built it. It was fun! Here’s a quick video of the end result.
If you’re interested in how I did it, read on.
The Main Pieces
There were 3 main pieces I put together to make this work.
- Wemo Smart Plug — The physical device that turns the light on and off.
- IFTTT — To set up a webhook that sends a signal to the Wemo Smart Plug.
- Netlify Functions — To create an intermediary between my blog and the webhook. Not strictly necessary, but a good idea for reasons I’ll get into later.
Let’s talk through each one.
Wemo Smart Plug
First we need something that can receive signals over the internet to turn the light on and off. I’m not much of a hardware engineer, so I was happy to get a wi-fi enabled smart plug to handle this job. I settled on the Wemo Smart Plug. I got a 3-pack, but you could just buy a single.
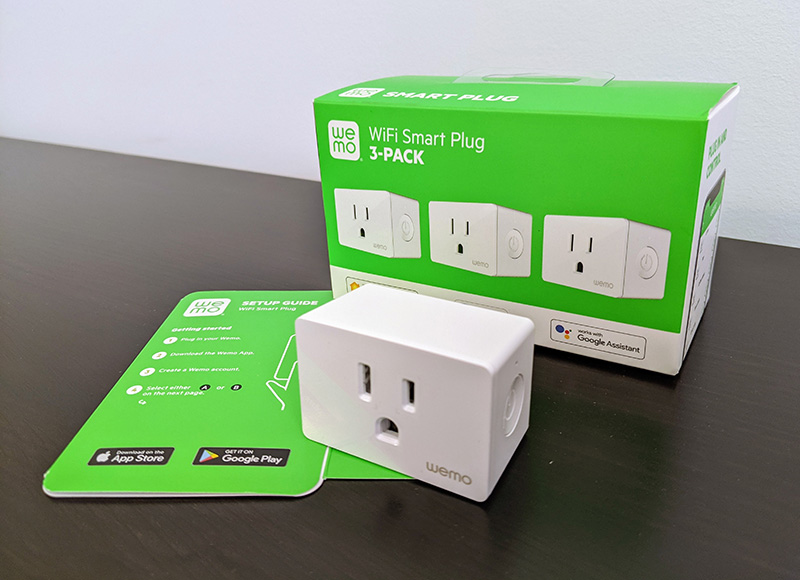
Setup was simple enough. Plug the smart plug into an outlet and the light into the smart plug. Download the app, create a Wemo account, and connect the smart plug to your wi-fi network (it’s easy to do in the app).
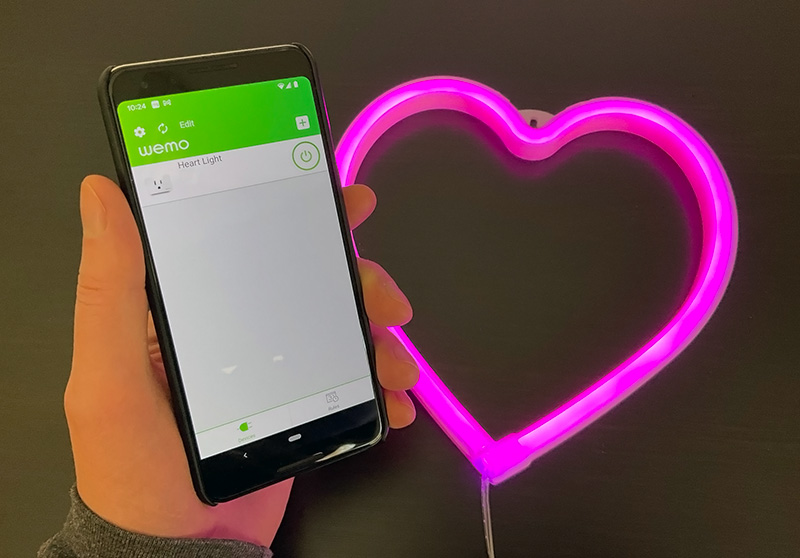
At this point you can use the app to turn the smart plug (and consequently, the light) on and off. That’s cool, but the real fun is getting something else to control the smart plug. That’s where IFTTT comes in.
IFTTT
IFTTT (IF This Then That) is a service that lets you connect things by creating cause-and-effect relationships in the form of applets. It’s great because the interface for setting up an applet is very easy to work with, while all the tricky API stuff is handled for you. IFTTT lets you create up to 5 applets for free.

For this project, we want to create an applet such that if a webhook receives a request, then turn the smart plug on and off. The webhook will live at a specially crafted URL that IFTTT will host for us. Pinging the URL triggers the webhook (which triggers the smart plug).
Here are the steps to set this up.
- Head over to IFTTT and create your account.
- Once you’ve logged in, create an applet.
- Click If This, search for “webhooks”, click on it.
- Click Receive a web request.
- Name the event (“heart_light” is what I used) and click Create trigger.
- Now click Then That, search for “wemo smart plug”, click on it.
- Click Turn on then off.
- Click Connect and sign into your Wemo account.
- Select your smart plug from the dropdown and click Create action.
- Click Continue, then click Finish.
To find your webhook URL, go to this webhooks page and click the Documentation button. The URL will look something like this.
https://maker.ifttt.com/trigger/heart_light/with/key/YOUR_KEYYou can test that URL from that same page, or you can go to it directly from your browser. When you do, you should see your light turn on and off.
Now we have everything we need to add a clickable <button> to a web page that pings the webhook and triggers the light.
<button>❤️ click me!</button>document.querySelector('button').addEventListener('click', ping);
function ping() {
fetch('https://maker.ifttt.com/trigger/heart_light/with/key/YOUR_KEY');
}It’s happening!
Netlify Functions
We have a working project at this point, but there’s one thing I’m not thrilled about. The client-side JavaScript shown above pings the webhook URL directly, which means the URL and our key are exposed publicly. Sometimes this is totally fine, but personally I’d prefer to keep them secret.
My solution is to use Netlify Functions to create an API endpoint — basically just a different URL to ping. When pinged, it’ll run server-side JavaScript that turns around and pings the IFTTT webhook URL. Since it’s server-side, the webhook URL and key are not exposed. As a bonus, this also gives us an opportunity to do other things server-side, like logging.
I put together an example repo to show exactly how to do this. Let’s cover the highlights.
The code for the server-side function is in /netlify/functions/heart-light.js. It pings the IFTTT webhook URL, logs the response, and then returns its own response depending on if the ping went OK or not.
const fetch = require('node-fetch');

exports.handler = async () => {
  const url = 'https://maker.ifttt.com/trigger/heart_light/with/key/YOUR_KEY'; // change this!
  const response = await fetch(url);

  const text = await response.text();
  console.log(response.status, text);

  if (response.ok) {
    return { statusCode: 200, body: 'Success!' };
  } else {
    return { statusCode: 500, body: 'Error.' };
  }
}
The code has a single dependency on node-fetch, so we need to declare that in /package.json.
"devDependencies": {
  "node-fetch": "^2.6.6"
}
Note that we’re using node-fetch v2. That’s because node-fetch was converted to an ES module as of v3, which doesn’t work with Netlify functions out of the box. You can make it happen with some extra steps or just install v2 explicitly.
npm install node-fetch@^2 --save-devNow the client-side JavaScript can call the function instead of calling the IFTTT webhook directly. You can see this in /page.js. Note that the function file lives at /netlify/functions/heart-light.js but we call the function at /.netlify/functions/heart-light!
document.querySelector('button').addEventListener('click', ping);
function ping() {
fetch('/.netlify/functions/heart-light');
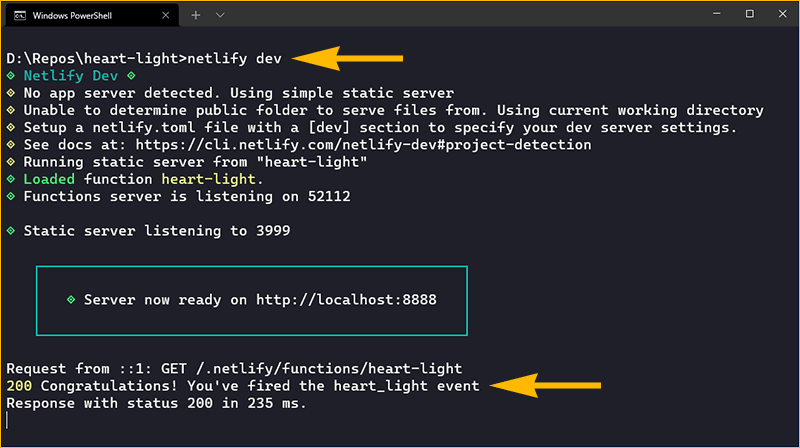
}The example repo we’ve been looking at is a (small) fully functional Netlify site. You can get it up and running locally via the command line.
- Install the Netlify CLI with
npm install netlify-cli -g. - Install the example repo’s dependencies with
npm install. - Start a local dev server with
netlify dev.
Here’s what you’ll see when you run netlify dev and then click the button on the page. Success!
My site is already hosted on Netlify, so I incorporated the Netlify function into my existing codebase. If that’s not the case for you, then you can still deploy a standalone Netlify site with just the function and have your existing site ping it with an absolute URL.
Wrapping Up
That’s about it. You’ve probably already noticed the heart icon on this page. Now you know what it does and how it works. Thanks for reading!